
 Temperature and humidity will have a substantial effect on the lifespan of your hardware. Almost all computers and servers have several temperature sensors for gathering component or ambient temperatures. Humidity sensors though, are often overlooked. With very few and inexpensive components, we can monitor both in Zabbix.
In short, we hook up an DHT22/AM2302 sensor to a Raspberry Pi 3, load Raspbian onto it, install the Zabbix Agent and configure it to pull temperature and humidity data through a small Python script.
Although this can seem difficult to accomplish, trust me, it isn’t!
Requirements
All necessary components can be found at DX.com which also offers world-wide free shipping.
The parts total about $72, the Raspberry Pi and power supply being the most costly at $53 combined. If you already have a Raspberry Pi or Raspberry Pi 2, these will do just fine. Any decent 1A+ micro USB power adapter, Micro SD card and SD card reader will also get the job done.
- Raspberry Pi 3 B+
- Raspberry Pi Power Supply
- DHT22/AM2302 Sensor Module
- SanDisk Ultra 32GB Micro SD Card
- SD Card Reader USB 3.0
- Raspberry Pi Case (optional)
This guide is written using a Raspberry Pi 3 with Raspbian Jessie Lite, Python 2.7 and Zabbix Agent 2.2.7 installed.
Download Raspbian Lite
Download Raspbian Lite: https://www.raspberrypi.org/downloads/raspbian/
Write Raspbian to your SD card
Install Win32DiskImager: https://sourceforge.net/projects/win32diskimager/files/latest/download
Extract the Raspbian IMG file from the downloaded ZIP file
Open Win32DiskImager, select your Raspbian IMG file, select your micro SD card device and click “Write”.
When finished, insert the micro SD card into your Raspberry Pi.
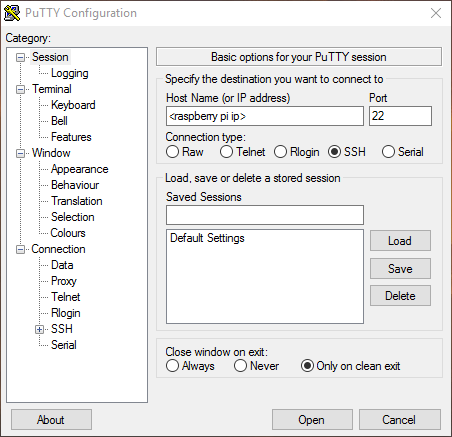
Hook up your Raspberry Pi and connect via SSH
Connect your Raspberry Pi to your local network with an Ethernet cable and plug in the power supply. After about 30-60 seconds, the Raspberry Pi is booted.
To find the IP of the Pi, you can use a network scanning tool like SoftPerfect Network Scanner or similar.
Connect to the Pi using the Putty SSH client. The default username is “pi” and the password is “raspberry”.


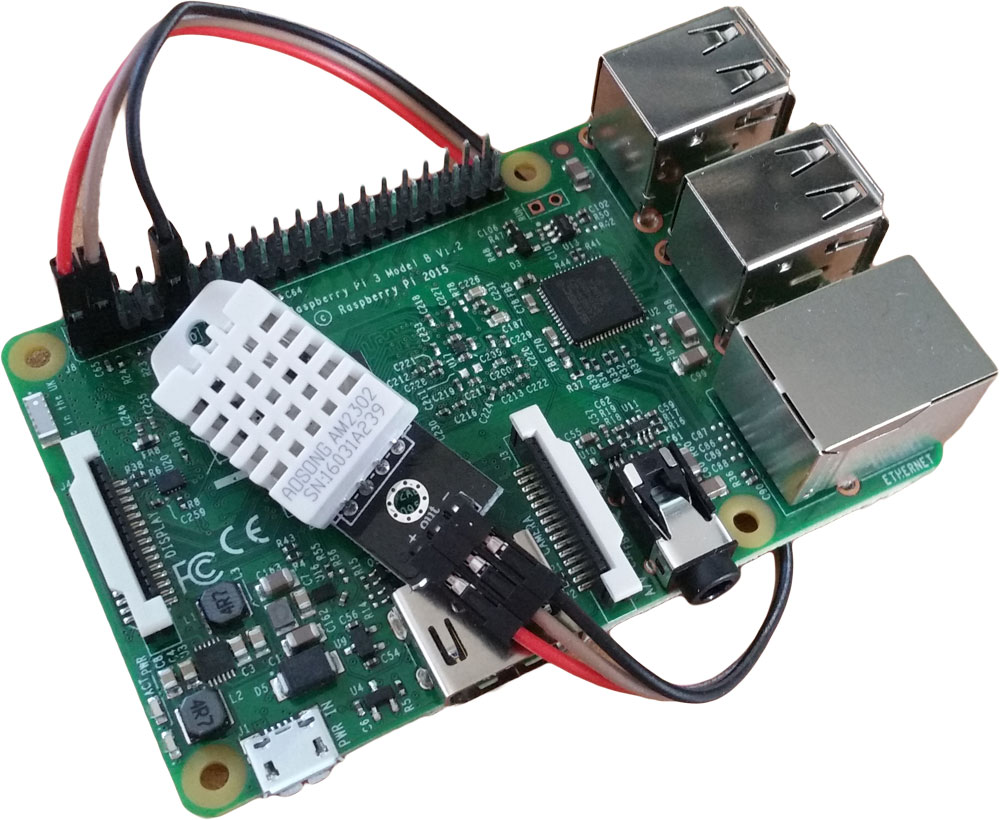
Connect the sensor module
With the Pi booted and ready to go, we now have to connect the sensor module.
 The sensor module has 3 pins. Looking at the front, they are:
Left: 3.3v
Middle: GPIO
Right: GroundWith the module, you also received a set of wires, red, brown and black. Red goes to the left pin, brown to the middle one and black goes to the right pin.
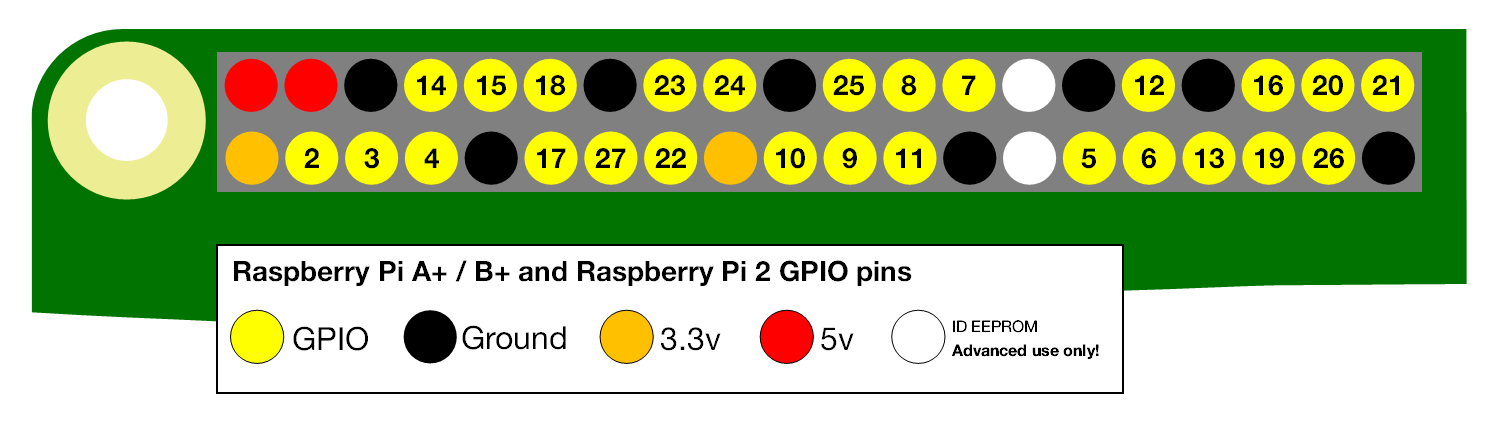
The pins now have to be connected to the Pi’s GPIO pins, which is the two large rows of pins at the edge of the Pi board. Note, Raspberry Pi 2 and 3 pin placements are identical.

 Connect the wires in this order:
Red (3.3v) → Any orange pin
Brown (GPIO) → Pin number 2
Black (ground) → Any black pinYou can take a peak at the top image, to see how I’ve connected my module.
Installing software on the Pi
Having earlier connected to the Pi via SSH, we now have to install the necessary software to pull temperature and humidity data from the sensor module. In the Putty SSH console, do the following:
sudo apt-get update && sudo apt-get -y install git python-dev
git clone https://github.com/adafruit/Adafruit_Python_DHT.git
cd Adafruit_Python_DHT/
sudo python setup.py install
This ensures we have the necessary Python module compiled and installed, which enables us to pull data via the GPIO integrated circuit.
Test your sensor!
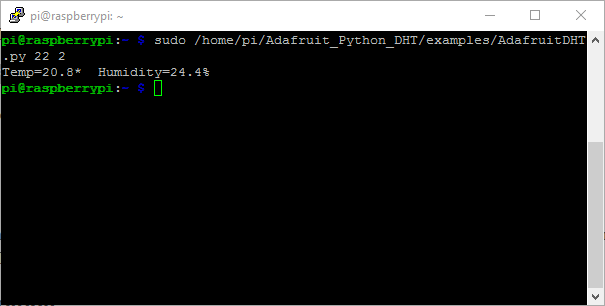
We should now be able to pull data from the module with an already provided example script. To do so:
sudo /home/pi/Adafruit_Python_DHT/examples/AdafruitDHT.py 22 2
In your console, you should now receive output similar to:
The first argument denotes the model we’re using, the DHT22. The second argument is the GPIO pin # we chose earlier. The temperature received is in Celcius and the humidity is in percent.We’ve successfully pulled data from the sensor module. Let’s configure Zabbix Agent to do the same!
Zabbix Agent configuration
We can run Python scripts manually, but luckily the Zabbix Agent can as well. First, install the Zabbix Agent on the Pi:
sudo apt-get -y install zabbix-agent
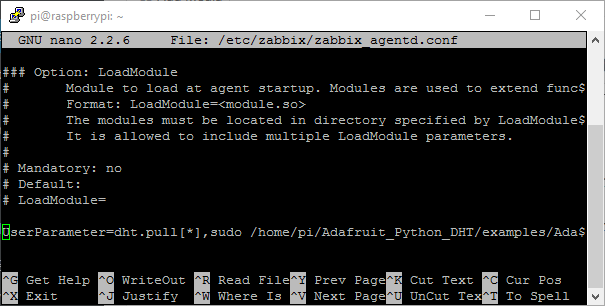
We need to slightly modify the Zabbix Agent configuration file. Open the configuration file:
sudo nano /etc/zabbix/zabbix_agentd.conf
NOTE: The “Server” parameter is used for whitelisting IP addresses you wish to allow communication with the Zabbix Agent. For testing purposes, we’re using the default of “127.0.0.1” which means we can ONLY communicate with the agent locally. This parameter will need to be configured to the correct IP address of your Zabbix server when you wish for the server retrieve data from the agent.
Insert this line exactly as is, at the end of the configuration file:
UserParameter=dht.pull[*],sudo /home/pi/Adafruit_Python_DHT/examples/AdafruitDHT.py 22 2 | awk -F[=*%] '{print $$$1}'Ctrl+X to quit, “Y” to save and then <Enter>.
NOTE: Some might experience longer than usual polling time when querying environment data from the sensor module. This can result in the Zabbix Agent UserParameter script timing out. To circumvent this issue, you can increase the configuration parameter ‘Timeout’ from the default of 3 seconds, to 5 seconds instead, or longer if necessary.
Restart the Zabbix Agent:
sudo service zabbix-agent restart
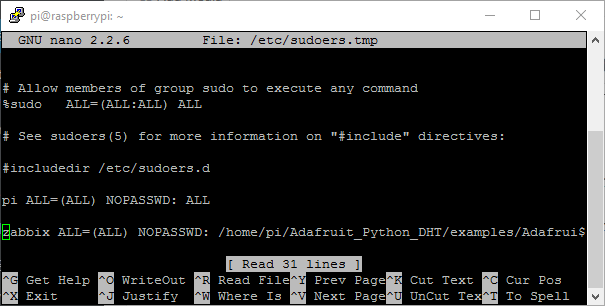
We also have to grant the “zabbix” user the correct permissions to pull GPIO data. We need to allow it to act as the root superuser, when executing the AdafruitDHT.py script. Raspbian uses the “sudo” program for this. Open the “sudo” configuration by typing:
sudo visudo
And the bottom of the file, insert:
zabbix ALL=(ALL) NOPASSWD: /home/pi/Adafruit_Python_DHT/examples/AdafruitDHT.py
Ctrl+X to quit, “Y” to save and then <Enter>.
Retrieving temperature and humidity with the Zabbix Agent
For testing purposes, we need the “zabbix_get” program. For Raspbian, it comes as part of the “zabbix-proxy-sqlite3” package which we then need to install:
sudo apt-get -y install zabbix-proxy-sqlite3
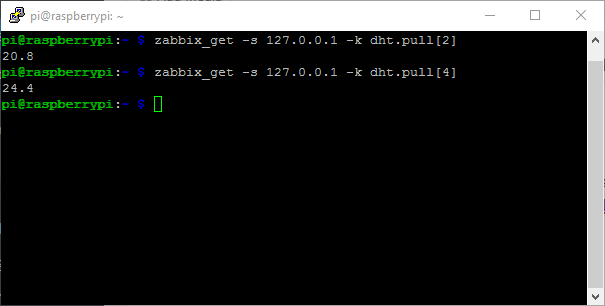
At last, we are now ready to perform the final test. The agent item key we wish to pull is “dht.pull”. It has two parameters we can choose from; “2” to retrieve temperature in celcius and “4” to retrieve humidity in percent.
Let’s test it:
zabbix_get -s 127.0.0.1 -k dht.pull[2]
zabbix_get -s 127.0.0.1 -k dht.pull[4]
We’re done! We can now easily pull data about environment humidity and ambient temperature!
The Raspberry Pi could now be placed at a remote site, to monitor the environment there. This would then enable you to receive an alert of any sudden fluctuations in temperature and humidity happens!
Additionally, I’ve created a small template that pulls temperature and humidity every 60 seconds. Get it here.
Feel free to leave a comment, if you have any tips or suggestions for this guide!


“$1”}’
Ctrl+X to quit, “Y” to save and then <Enter>.
NOTE: Some might experience longer than usual polling time when querying environment data from the sensor module. This can result in the Zabbix Agent UserParameter script timing out. To circumvent this issue, you can increase the configuration parameter ‘Timeout’ from the default of 3 seconds, to 5 seconds instead, or longer if necessary.
Restart the Zabbix Agent:
We also have to grant the “zabbix” user the correct permissions to pull GPIO data. We need to allow it to act as the root superuser, when executing the AdafruitDHT.py script. Raspbian uses the “sudo” program for this. Open the “sudo” configuration by typing:
And the bottom of the file, insert:
Ctrl+X to quit, “Y” to save and then <Enter>.
Retrieving temperature and humidity with the Zabbix Agent
For testing purposes, we need the “zabbix_get” program. For Raspbian, it comes as part of the “zabbix-proxy-sqlite3” package which we then need to install:
At last, we are now ready to perform the final test. The agent item key we wish to pull is “dht.pull”. It has two parameters we can choose from; “2” to retrieve temperature in celcius and “4” to retrieve humidity in percent.
Let’s test it:
We’re done! We can now easily pull data about environment humidity and ambient temperature!
The Raspberry Pi could now be placed at a remote site, to monitor the environment there. This would then enable you to receive an alert of any sudden fluctuations in temperature and humidity happens!
Additionally, I’ve created a small template that pulls temperature and humidity every 60 seconds. Get it here.
Feel free to leave a comment, if you have any tips or suggestions for this guide!
Great article! I’ll test this solution. Can you believe that we can use this on a production environment?
Congratulations!
Coincidentally, we’re setting one up in one of our data centers tomorrow 🙂
When testing it, it seemed precise enough, but I would expect it to be maybe a few degrees off. We plan to use it for spotting sudden fluctuations and to gather history data, not for precise measurements.
Don’t rely on it for anything. Use it as a data gathering tool and have redundancies for environmental monitoring. Where we are hosted, already has monitoring. We just don’t have access to that data unfortunately, so we have to be creative!
This is what I have been looking for! Remote sensing of temp and humidity in a unix/raspi environment. Would it be possible to hook up several sensors to the same raspberry pi?
/Fredrik
Hi Fredrik,
As the DHT22/AM2302 module requires a 3.3v connection, by default you should be able to use two of them on the same Raspberri Pi, without any additional tinkering.
The GPIO 3.3V rails do allow for multiple modules, so you could DIY or maybe with an expander module.
Hi Martin,
Thanks for the great tutorial… I have my Raspberry Pi all configured and working.
I am however, having some difficulty getting this setup on my Zabbix server to generate alerts.
I imported your template successfully into Zabbix frontend and linked it to the newly created RaspberryPi host. From here I’m pretty lost on how to get the alerts working. I can see the Ambient Temperature and Humidity entries under the “Items ” tab in Host -> Configuration, they are both enabled.
I’m assuming I need to create a trigger at this point?
I’m very new to Zabbix, so learning as I go along. Would highly appreciate it if you could point me in the right direction.
Many thanks.
Hello Craig,
Yes, you do need to create a trigger! Triggers, essentially, simply check if something is True based on the criteria you set up.
So, let’s say you’re receiving your ambient temperature in celsius and you wish to get alerted when the temperature moves above 35c, a trigger would look like this:
{Template DHT22 Module:dht.pull[2].last()}>35However, this would result in some flapping, if the temp. is right around 35c. So an even better trigger, would be to check if the temperature has been above 35c, within the last 3 hours:
{Template DHT22 Module:dht.pull[2].max(3h)}>35The key difference here is the “.last” and “.max” parts of the triggers. These are trigger functions and specify how you retrieve data about the item you’re creating the trigger for. You can read more about those here: https://www.zabbix.com/documentation/3.4/manual/appendix/triggers/functions
That is what I was looking to monitor temperature and relative humidity in my small sever area under stairs.
Only one one problem came along that was time out to run script, so I have changed Timeout setting from 3 seconds to 10 seconds in zabbix_agentd.conf
Hi,
Thanks for very useful instruction to monitor humidity and temperature by Zabbix, but I have a problem I added the template to my Zabbix server and defined Raspberry as host and also, change server in zabbix_agent.conf but It does not receive ant traffic from host.
The error : Check access restrictions in Zabbix agent configuration
Would you please help me in this regard?
Thanks
Hi Kaveh,
Make sure your agent conf file is properly configured, specifically the ‘Server’ entry:
List of comma delimited IP addresses (or hostnames) of Zabbix servers. Spaces are allowed since the Zabbix 2.2 version.
Incoming connections will be accepted only from the hosts listed here.
If IPv6 support is enabled then ‘127.0.0.1’, ‘::127.0.0.1’, ‘::ffff:127.0.0.1’ are treated equally.
Also, if having issues, you can set DebugLevel to 4 to see why your agent is denying you access in your log file.
Remember to restart the agent after having made changes.
Cheers!
Thank you Martin
It was solved, but something makes me confused because pulling humidity and temperature is working for a while and after that Zabbix send an error I could not execute shell script. After some minutes again working.
Do you know why?
Many Thanks.
Good to hear!
Regarding your issue, you probably need to increase your Zabbix Agent “Timeout” parameter in the config file to something like 10 seconds to be safe. That should solve it.
Hi Martin,
Thank you very much for the great tutorial to monitor humidity and temperature by using Zabbix monitoring system.
I use Raspberry Pi 3 and DHT22 2302 sensor and all configured and worked well.
For the Trigger on Zabbix I configured the value
Problem expression: {Zabbix Agent :dht.pull[2].last()}>30
Recovery expression: {Zabbix Agent :dht.pull[2].last()}<22
Thank you.
Hi Martin,
How to do it if you want to display the graph on zabbix (temp & humidity from DHT22)
Hi Dauzayl,
If you’ve followed the guide and imported the linked template, as well as added your Raspberry Pi host to your Zabbix setup, simply add the template to the Raspberry Pi host and Zabbix will begin collecting data. After a short while, you can access the gathered data via “Monitoring -> Latest Data”, search for your host and view the data here!
Hi Martin,
thank you for the replies, I have done as instructed (I attached to the attachment), but there is something I want to ask again, that is:
– in the template that I import there is no graph, triggers and screen it
– whether this template can be used in zabbix version 3.2.4
– the following links for screenshoot that I have set in my place “https://drive.google.com/file/d/11Scm48XYZCuDWgMCAC1IAIcWR3FZPhhm/view?usp=sharing”
sorry for i still newbi for raspberry 🙂
According to your screenshots, you’ve added the template to your host, so I believe you should be gathering data correctly. You can check for that under “Monitoring -> Latest data” via Zabbix Web UI.
You are correct that there are no graphs, triggers and screens in the template. You will have to add those yourself.
Hi Martin,
can you help me again 🙂
i still can no get value temp & humi from ny raspberry 🙂
the following links for screenshoot that I have set in my place “https://drive.google.com/open?id=1Uw6Ez85KXVn3YW9ZsLQCLZq4k0rE0076”
Hi Dauzayl,
Since you’re able to pull data using ‘zabbix_get’, this seems like an issue with the host and/or item configuration on the web interface. Double check your host and item settings and it should work for you 🙂
Hi Martin,
is this due to this?
https://drive.google.com/file/d/1sGr2m8E0EIvpvR6IVU2MgDCs63RPp4lo/view?usp=sharing
I am still curious about this 🙂
That looks like an issue with your Zabbix Agent UserParameter. Make sure it looks exactly like this:
UserParameter=dht.pull[*],sudo /home/pi/Adafruit_Python_DHT/examples/AdafruitDHT.py 22 2 | awk -F[=*%] '{print '$'"$1"}'Hi I get ist waring or error
please help
root@raspberrypi:~# zabbix_get -s 127.0.0.1 -k dht.pull[2]
We trust you have received the usual lecture from the local System
Administrator. It usually boils down to these three things:
#1) Respect the privacy of others.
#2) Think before you type.
#3) With great power comes great responsibility.
sudo: no tty present and no askpass program specified
root@raspberrypi:~#
In section 7, right after doing ‘sudo visudo’, add this line at the bottom:
Defaults:zabbix !requiretty
Then add the other line as described and it should work.
no sorry don’t work
sudo visudo
then add at bottom
Defaults:zabbix !requiretty
zabbix ALL=(ALL) NOPASSWD: /home/pi/Adafruit_Python_DHT/examples/AdafruitDHT.py
I did make a new. system with jessi
whats wrong
pi@raspberrypi:~/Adafruit_Python_DHT $ sudo python setup.py install
Extracting in /tmp/tmpNRrc1i
Traceback (most recent call last):
File “setup.py”, line 4, in
use_setuptools()
File “/home/pi/Adafruit_Python_DHT/ez_setup.py”, line 140, in use_setuptools
return _do_download(version, download_base, to_dir, download_delay)
File “/home/pi/Adafruit_Python_DHT/ez_setup.py”, line 120, in _do_download
_build_egg(egg, archive, to_dir)
File “/home/pi/Adafruit_Python_DHT/ez_setup.py”, line 62, in _build_egg
with archive_context(archive_filename):
File “/usr/lib/python2.7/contextlib.py”, line 17, in __enter__
return self.gen.next()
File “/home/pi/Adafruit_Python_DHT/ez_setup.py”, line 100, in archive_context
with ContextualZipFile(filename) as archive:
File “/home/pi/Adafruit_Python_DHT/ez_setup.py”, line 88, in __new__
return zipfile.ZipFile(*args, **kwargs)
File “/usr/lib/python2.7/zipfile.py”, line 770, in __init__
self._RealGetContents()
File “/usr/lib/python2.7/zipfile.py”, line 811, in _RealGetContents
raise BadZipfile, “File is not a zip file”
zipfile.BadZipfile: File is not a zip file
Hi s2k,
This seems Python related, and unfortunately I’m nowhere near a Python expert, sorry. You should probably check if your version of Python is compatible with the Adafruit Python DHT package. From their GitHub page: “Currently the library is tested with Python 2.6, 2.7, 3.3 and 3.4. It should work with Python greater than 3.4, too.”
Great article, but I would like to know if you can show us how to configure zabbix server to get data from raspberry (zabbix agent), thanks!
If you can install the Zabbix Agent on your Raspberry Pi, it will behave like any other agent, and you should be able to pull the same data from it.
I might do a post on how to quickly set up a simple Raspberry Pi agent, or maybe even a Zabbix Proxy, for gathering info from remote locations.
Hello,
I have done anything as described but I am still getting “Timeout while executing a shell script.”
Could you please help me? I do not know where to look. I have checked everything fre times.
Hi,
This is probably due to the check timing out. You can increase the Zabbix Agent configuration parameter ‘Timeout’ from the default of 3 seconds, to 5 seconds instead, or longer if necessary. The option can be found in the ‘/etc/zabbix/zabbix_agentd.conf’ file.
Also, make sure the script actually works correctly by manually, via SSH, running:
$ sudo /home/pi/Adafruit_Python_DHT/examples/AdafruitDHT.py 22 2Hi
Thank for that tutorial. I been able to have it in place in no time.
hello,
i already can get return data when do zabbix_get,
but when in graph of zabbix dashboard, the ambient temperature not showing the result, only 0
but the humidity is working normal
could you please help me
Hi Musakkarul. Try and check if the Temperature item is similarly configured to the working Humidity item, and if it is configured the same as the item name command you use when manually trying via zabbix_get.
Hi martinmoerch !!
I am not getting any temperature graph or anything else there relate to temperature.Please help me on this regard.
Hi martinmoerch !!
I am not getting any temperature graph or anything else there relate to temperature.Please help me on this regard.
Hi there,
Are you able to get values when testing?
zabbix_get -s 127.0.0.1 -k dht.pull[2]zabbix_get -s 127.0.0.1 -k dht.pull[4]
Yes . When i put my server IP in 127.0.0.1 then i get the value. But when i put my zabbix server Ip Server=x,x,x,x it has shown some error. zabbix_get [1093]: Check access restrictions in Zabbix agent configuration.
Ambient temperature and humidity garph also hasnt shown there.
Thanks .
Try to use zabbix_get from your Zabbix server, to test if it is allowed to contact your agent. Also, on your agent, make sure the “Server=” parameter is correctly configured to allow your server to contact it e.g.
Server=IP or FQDN of serverDear Concern ,
Please help us to solve my problem . I am not getting any graph but successfully configured xml file in zabbix front end
Dear Sir ,
I configured zabbix agent in rasberry pi 3 and executed your above all the command an configuration there. When i run zabbix_get command in my zabbix server i am getting the tem and humidity both values. The obstacle is i am not getting any graph from there .Zabbix web has only shown application(1) and item(2) there no graph or trigger option there. Please share your valuable opinion.
The template does not include Screens or Graphs, but if you select “Monitoring -> Latest Data” and then search for your host, you will be able to find the items and then click “Graph” on the far right, you can view graphs for Temperature and Humidity. Good luck!
Thx for your great tutorial on monitoring temperatures with a RPi-
As I only got the unaltered (complete) output (i.e. Temp=28.7* Humidity=21.2%), I had to change the latter part of the UserParameter line from
‘{print ‘$'”$1″}’
to
‘{print $$$1}’
From the Zabbix documentation on ‘User parameters’
(…)
To use positional references unaltered, specify a double dollar sign – for example, awk ‘{print $$2}’. In this case $$2 will actually turn into $2 when executing the command.
[root@localhost ~]# zabbix_get -s 192.168.243.18 -k dht.pull[2]
zabbix_get [5591]: Check access restrictions in Zabbix agent configuration
Please help I am getting this error
https://www.google.com/search?client=firefox-b-d&q=Check+access+restrictions+in+Zabbix+agent+configuration
Hi & thanks for the tutorial!
However I can’t test the command to work.
zabbix_get -s 127.0.0.1 -k dht.pull[2]
zabbix_get command not found
But thats ok as I can execute this:
pi@raspberrypi:~/Adafruit_Python_DHT/examples $ sudo /home/pi/Adafruit_Python_DHT/examples/AdafruitDHT.py 22 4 | awk -F[=*%] ‘{print }’
Temp=17.8* Humidity=63.4%
However when I run
sudo zabbix_agentd -p
I get the error.
dht.pull zabbix_agentd [1048]: Warning: Failed to execute command “sudo /home/pi/Adafruit_Python_DHT/examples/AdafruitDHT.py 22 4 | awk -F[=*%] ‘{print }'”: Timeout while executing a shell script.
[m|ZBX_NOTSUPPORTED] [Timeout while executing a shell script.]
So I know this is working.
Zabbix also says unsupported items, but that is due to the timeout,.
Changed the timeout settings, now working from command line, but still getting errors in zabbix gui.
Any pointers?
Thanks dude!
Ok, fixed the zabbix errors but now a new error :
Value of type “string” is not suitable for value type “Numeric (unsigned)”. Value “Temp=16.4* Humidity=80.1%
Thanks,
Seems to an error in the UserParameter in this post, I think a WordPress upg. might’ve messed with it.
This UserParameter should work for you:
UserParameter=dht.pull[*],sudo /home/pi/Adafruit_Python_DHT/examples/AdafruitDHT.py 22 2 | awk -F[=*%] '{print $$$1}'Thanks that dude the trick!
Great tutorial btw, thanks for your post & support.
I set this up for several Pi’s last year and it’s been working great. But I have one that has stopped reporting, and now it errors out when running the test command. If I end the command early I see the response from the second attempt below.
pi@pi110sr:~ $ sudo /home/pi/Adafruit_Python_DHT/examples/AdafruitDHT.py 22 2
Failed to get reading. Try again!
pi@pi110sr:~ $ sudo /home/pi/Adafruit_Python_DHT/examples/AdafruitDHT.py 22 2
^CTraceback (most recent call last):
File “/home/pi/Adafruit_Python_DHT/examples/AdafruitDHT.py”, line 41, in
humidity, temperature = Adafruit_DHT.read_retry(sensor, pin)
File “build/bdist.linux-armv7l/egg/Adafruit_DHT/common.py”, line 97, in read_retry
KeyboardInterrupt
pi@pi110sr:~ $
I’m setting up a new Pi today and would like to try and configure it with 2 DHT22 sensors, but I’m running into the same issue that I pasted above. I assume it may be something with a recent update?
It looks like they’ve depreciated the Adafruit_Python_DHT library on Raspbian Buster. https://github.com/adafruit/Adafruit_Python_DHT
Hello,
Thanks for the tutorial, however I am not able to get the reading. The program is not working for me, I am not able to get any reading. However I have used another sample and i am able to get the value with same setup. The problem is I am not able to make the second program work with zabbix.
Here is the screnshot
https://i.postimg.cc/jjyGLWJS/2022-06-02-022802-1920×1080-scrot.png
Just wanted to say that your steps are great. I was however wondering if there were updated steps for Pi5 running bookworm. It now appears that in order to import the needed Libraries you need to run them in a Virtual Enviromint. I managed to get results on a PI5 ( locally) under a Virtual Enviromint session but zabbix does not seem to be able to access the session.
Also is there any steps or changes needed to use DHT11 sensors?
Hmm, so this works great on a Pi3. But trying to do this on a Pi4 it does not work. Anyone have this working on a Pi4? The Adafruit library does not want to run.
I was wondering if anyone has updated procedures for the newer Versions of rasp pi and the later OS versions. I have multiple units running with Bulleye on Pi3 but I will need to updated them soon.